
티스토리 뷰
Bean
- @Bean
- 빈 객체를 참조할 때 사용
- 객체를 생성하고 알맞게 생성해야 한다.
- 개발자가 컨트롤 하기 불가능한 외부 라이브러리 들을 Bean 으로 등록하고 싶은 경우에 사용
- 예를 들어 ObjectMapper 의 경우 ObjectMapper 클래스에 @Component를 선언할 순 없으니 ObjectMapper의 인스턴스를 생성하는 매서드를 만들고, 해당 메소드에 @Bean을 선언하여 Bean으로 등록한다.
- bean?
- 스프링 IOC 컨테이너가 관리하는 객체.
Controller, RestController
- @Controller
- 스프링 MVC 에서 컨트롤러로 사용한다.
- @RestController
- @Controller, @ResponseBody 을 합쳐놓은 어노테이션.
  @RestController
  public class MyClass{
      @Autowired MyService myService;
      @RequestMapping(value="/url")
      public Map<String, Object> register() throws Exception{
          return myService.selectMyInfo();
      }
  }
위 두 코드는 동일한 동작을 한다.@Controller public class MyClass{ @Autowired MyService myService; @RequestMapping(value="/url") public @ResponseBody Map<String, Object> register() throws Exception{ return myService.selectMyInfo(); } }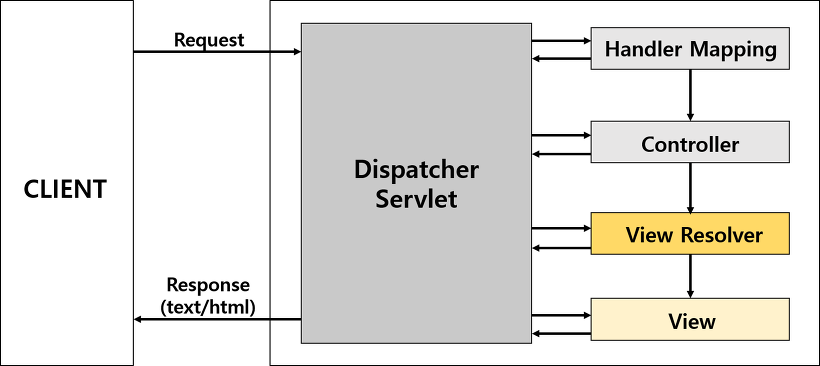
- 위 그림에서 알 수 있듯이, Spring은 요청이 오면 view resolver를 통해 사용자에게 text/html 응답을 보내주게 된다.

- 그에 반해 RestController에서 return되는 값은 위 그림애서 처럼 HttpResponsebody에 직접 쓰여지게 된다.
- @Controller, @ResponseBody 을 합쳐놓은 어노테이션.
차이점?
- @Controller는 View페이지를 반환하지만, @RestController는 객체를 반환하고, 그 객체는 application/json 형식의 HttpResponseBody에 직접 작성된다.
SpringBootApplication
- @SpringBootApplication
- @EnableAutoConfiguration
- @ComponentScan
- @Configuration
- 위 세개의 어노테이션을 포함한다.
RequestMapping, GetMapping, PostMapping
- @RequestMapping
- PostMapping
- @GetMapping
사용 예
@GetMapping(value="/{type}/aliveCheck")
public Map<String, Object> aliveCheck(@PathVariable String type) throws Exception{
    ...
}
@GetMapping(value="/{type}/log-tail")
public Map<String, Object> log(@PathVariable String type, @RequestParam("fp") String filePointer) throws Exception{
...
}Service, Repository, Component
https://www.baeldung.com/spring-component-repository-service
다른 점?
The major difference between these stereotypes is they are used for different classification. When we annotate a class for auto-detection, then we should use the respective stereotype.
- @Component
- @Service, @Repository 용도 외에 Bean으로 등록하고 싶은 것에 사용
- @Repository
- persistence specific exceptions를 캐치하고, 그것을 Spring의 unified unchecked exception으로 rethrow 하는 일을 함.
- @Service
- Business Logic이 구현되어 있다는 것을 의미함.Layer에서 Service를 명시하기 위해 사용
Autowired, Resource
| - | @Autowired | @Inject | @Resource |
|---|---|---|---|
| 스프링 전용 | 자바에서 지원 | ||
| 연결방식 | 타입에 맞춰 연결 | 타입에 맞춰 연결 | 이름으로 연결 |
| 연결방식2 | @Autowired @Qualifier('이름') | @Inject @Qualifier('이름') |
@Autowired
객체를 자동으로 주입하는 어노테이션
어떤 빈을 주입할 지 선택지가 명확하니 컨테이너가 알아서 resolve 해달라는 의미
해당 타입의 빈 객체가 존재하지 않는 경우 예외 처리
- @Autowired(required=false)
- 기본 : @Autowired(required=true)
동일한 타입의 빈 객체가 두 개 이상 존재하는 경우 예외 처리
- @Qualifier("설정파일에서 지정한 값")으로 지정
사용법
필드 주입
setter
생성자
순환 참조에 의한 stack overflow 방지 가능
null pointer exception 방지 가능(setter 사용하는 경우, set 되기 전 객체를 사용하면 null pointer exception 발생 가능.)
public class MyController {
  private MyService myService;

  @Autowired // 인젝션 할 필드가 한개 라면 생략 가능.
  public MyController(MyService myService){
      this.myService = myService;
  }
}
주의사항
@Async나@Transaction같이 AOP기능이 사용된 Bean을 주입하는 경우*스프링에서 가장 기본적으로 사용되는 스프링 AOP 방식은 런타임시 JDK dynamic proxy를 사용하도록 되어있다. 만약 내가 주입하고자 하는 Bean에 AOP가 사용되었고, 특정 interface를 구현한 객체라면 주입할때 타입을 인터페이스 타입으로 선언해 주거나 AOP 방식을 CGLIB proxy 방식을 사용 혹은 AspectJ를 사용해야 한다.
주입할때 타입을 인터페이스 타입으로 선언
 @Configuration
 @EnableAsync
 public class AsyncConfig{

 }

 public interface AInterface{
     ...
 }

 @Service
 public class AClass implements AInterface{
     @Async("asyncExecutor")
     public void myMethod(){
         ...
     }
 }

 public class AController{
     // 타입을 인터페이스로 선언해줘야 한다.
     // 클래스 타입 선언 시 BeanNotOfRequiredTypeException 발생
     @Autowired AInterface aClass;
 }
CGLIB proxy 방식을 사용
 @Configuration
 @EnableAsync(proxyTargetClass=true)
 public class AsyncConfig{

 }

 public interface AInterface{
     ...
 }

 @Service
 public class AClass implements AInterface{
     @Async("asyncExecutor")
     public void myMethod(){
         ...
     }
 }

 public class AController{
     // 둘 다 사용 가능
     @Autowired AInterface aClass;
     @Autowired AClass aClass;
 }
AspectJ를 사용
 @Configuration
 @EnableAsync(mode=AdviceMode.ASPECTJ)
 public class AsyncConfig{

 }

 public interface AInterface{
     ...
 }

 @Service
 public class AClass implements AInterface{
     @Async("asyncExecutor")
     public void myMethod(){
         ...
     }
 }

 public class AController{
     // 둘 다 사용 가능
     @Autowired AInterface aClass;
     @Autowired AClass aClass;
 }
Configuration
- @Configuration
- 스프링 설정 클래스로 지정한다.
PropertySource
- @PropertySource(value = "classpath:common.properties")
EnableWebSecurity
- @EnableWebSecurity
- WebSecurityConfigureAdapter는 Spring Security 기능을 사용할 때 함께 사용한다.
'spring boot' 카테고리의 다른 글
| JPA(Java Persistence API) (0) | 2021.12.22 |
|---|---|
| bean 초기화 과정 (0) | 2021.12.22 |
| bean 등록 과정 (0) | 2021.12.22 |
- Total
- Today
- Yesterday